Compositing using orx-compositor
orx-compositor offers a simple DSL for the creation of layered graphics. The compositor manages blending and post-processing of layers for you.
orx-compositor works well together with orx-fx, orx-gui, and
orx-olive, although they are not a required
combination it is worth checking out what the combination has to offer.
Prerequisites
If you are working on an
openrndr-template based
project, orx-compositor should be ready to use because it is part of the basic
orx bundle, as described in ORX.
Workflow
Let us now work through the workflow of orx-compositor.
One usually starts with an OPENRNDR skeleton program:
import org.openrndr.application
import org.openrndr.color.ColorRGBa
import org.openrndr.draw.loadFont
import org.openrndr.draw.loadImage
import org.openrndr.extra.color.colormatrix.tint
import org.openrndr.extra.compositor.*
import org.openrndr.extra.fx.blend.Add
import org.openrndr.extra.fx.blend.Normal
import org.openrndr.extra.fx.blur.ApproximateGaussianBlur
import org.openrndr.extra.fx.distort.HorizontalWave
import org.openrndr.extra.fx.distort.VerticalWave
import org.openrndr.extra.fx.shadow.DropShadow
import org.openrndr.extra.textwriter.Cursor
import org.openrndr.extra.textwriter.writer
import org.openrndr.shape.Rectangle
import kotlin.math.cos
import kotlin.math.sin

fun main() = application {
    program {
        extend {

        }
    }
}
Which by itself, of course, does nothing. Let’s extend this skeleton
a bit and add the basics for layered
graphics. We add a composite using compose {} and we make sure that
our OPENRNDR program draws it on refresh.
Note, if this fails you can fix it by adding
import org.openrndr.extra.compositor.draw.
import org.openrndr.application
import org.openrndr.color.ColorRGBa
import org.openrndr.draw.loadFont
import org.openrndr.draw.loadImage
import org.openrndr.extra.color.colormatrix.tint
import org.openrndr.extra.compositor.*
import org.openrndr.extra.fx.blend.Add
import org.openrndr.extra.fx.blend.Normal
import org.openrndr.extra.fx.blur.ApproximateGaussianBlur
import org.openrndr.extra.fx.distort.HorizontalWave
import org.openrndr.extra.fx.distort.VerticalWave
import org.openrndr.extra.fx.shadow.DropShadow
import org.openrndr.extra.textwriter.Cursor
import org.openrndr.extra.textwriter.writer
import org.openrndr.shape.Rectangle
import kotlin.math.cos
import kotlin.math.sin

fun main() = application {
    program {
        val composite = compose {

        }

        extend {
            composite.draw(drawer)
        }
    }
}
Now let’s draw something. We do this by adding a draw {} inside
the compose {}. Here we see we use drawer like we would use it
normally (it is captured in the closure). We also added a println
to demonstrate that the code inside compose {} is executed once,
however, code inside draw {} is executed every time the composite is
drawn.
import org.openrndr.application
import org.openrndr.color.ColorRGBa
import org.openrndr.draw.loadFont
import org.openrndr.draw.loadImage
import org.openrndr.extra.color.colormatrix.tint
import org.openrndr.extra.compositor.*
import org.openrndr.extra.fx.blend.Add
import org.openrndr.extra.fx.blend.Normal
import org.openrndr.extra.fx.blur.ApproximateGaussianBlur
import org.openrndr.extra.fx.distort.HorizontalWave
import org.openrndr.extra.fx.distort.VerticalWave
import org.openrndr.extra.fx.shadow.DropShadow
import org.openrndr.extra.textwriter.Cursor
import org.openrndr.extra.textwriter.writer
import org.openrndr.shape.Rectangle
import kotlin.math.cos
import kotlin.math.sin

fun main() = application {
    program {
        val composite = compose {
            println("this is only executed once")

            draw {
                drawer.fill = ColorRGBa.PINK
                drawer.stroke = null
                drawer.circle(width / 2.0, height / 2.0, 175.0)
            }
        }

        extend {
            composite.draw(drawer)
        }
    }
}
Let’s get to what orx-compositor promises: layered graphics.
We do this by adding a layer {}
inside our composite, and inside this layer we add another draw.
Every layer has an isolated draw state to prevent users from leaking draw state.
import org.openrndr.application
import org.openrndr.color.ColorRGBa
import org.openrndr.draw.loadFont
import org.openrndr.draw.loadImage
import org.openrndr.extra.color.colormatrix.tint
import org.openrndr.extra.compositor.*
import org.openrndr.extra.fx.blend.Add
import org.openrndr.extra.fx.blend.Normal
import org.openrndr.extra.fx.blur.ApproximateGaussianBlur
import org.openrndr.extra.fx.distort.HorizontalWave
import org.openrndr.extra.fx.distort.VerticalWave
import org.openrndr.extra.fx.shadow.DropShadow
import org.openrndr.extra.textwriter.Cursor
import org.openrndr.extra.textwriter.writer
import org.openrndr.shape.Rectangle
import kotlin.math.cos
import kotlin.math.sin

fun main() = application {
    program {
        val composite = compose {
            draw {
                drawer.fill = ColorRGBa.PINK
                drawer.stroke = null
                drawer.circle(width / 2.0, height / 2.0, 175.00)
            }

            layer {
                draw {
                    drawer.fill = ColorRGBa.PINK
                    drawer.stroke = null
                    drawer.circle(width / 2.0, height / 2.0 + 100.0, 100.0)
                }
            }
        }

        extend {
            composite.draw(drawer)
        }
    }
}This produces:
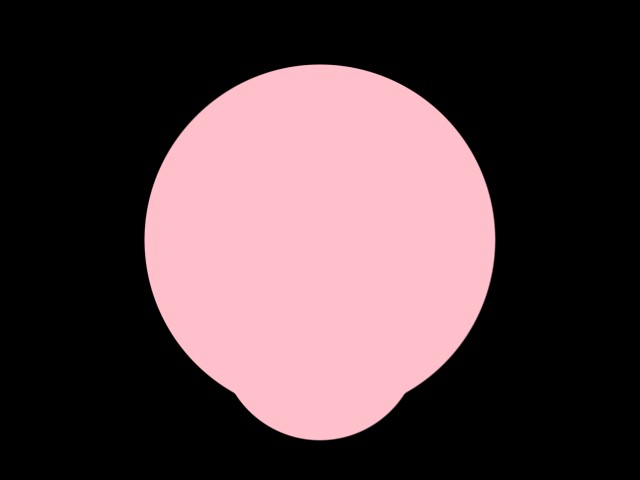
You may be thinking: “yeah great, we added all that extra structure to the code, but it doesn’t do a single thing that could not be achieved by drawing two circles consecutively”. And you’re right. However, there are now two things we can add with ease: blends and posts. Here a blend describes how a layer’s contents should be combined with the layer it covers, and a post a filter that is applied after the contents have been drawn.
Let’s add a blend and a post to our layer and see what it does:
import org.openrndr.application
import org.openrndr.color.ColorRGBa
import org.openrndr.draw.loadFont
import org.openrndr.draw.loadImage
import org.openrndr.extra.color.colormatrix.tint
import org.openrndr.extra.compositor.*
import org.openrndr.extra.fx.blend.Add
import org.openrndr.extra.fx.blend.Normal
import org.openrndr.extra.fx.blur.ApproximateGaussianBlur
import org.openrndr.extra.fx.distort.HorizontalWave
import org.openrndr.extra.fx.distort.VerticalWave
import org.openrndr.extra.fx.shadow.DropShadow
import org.openrndr.extra.textwriter.Cursor
import org.openrndr.extra.textwriter.writer
import org.openrndr.shape.Rectangle
import kotlin.math.cos
import kotlin.math.sin

fun main() = application {
    program {
        val composite = compose {
            draw {
                drawer.fill = ColorRGBa.PINK
                drawer.stroke = null
                drawer.circle(width / 2.0, height / 2.0, 175.0)
            }

            layer {
                blend(Add()) {
                    clip = true
                }
                draw {
                    drawer.fill = ColorRGBa.PINK
                    drawer.stroke = null
                    drawer.circle(width / 2.0, height / 2.0 + 100.0, 100.0)
                }
                post(ApproximateGaussianBlur()) {
                    window = 25
                    sigma = 10.00
                }
            }
        }
        extend {
            composite.draw(drawer)
        }
    }
}The output:
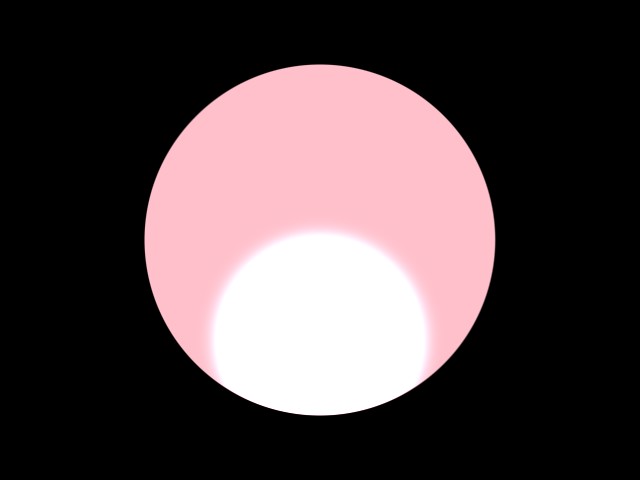
We now see a couple of differences. The smaller circle is blurred while the larger circle is not; The area where the two circles overlap is brighter; The smaller circle is clipped against the larger circle.
These are a results that are not as easily replicated without orx-compositor.
Note that the parameters for the post filters (and blend) can be animated, just as the layers contents can be animated:
import org.openrndr.application
import org.openrndr.color.ColorRGBa
import org.openrndr.draw.loadFont
import org.openrndr.draw.loadImage
import org.openrndr.extra.color.colormatrix.tint
import org.openrndr.extra.compositor.*
import org.openrndr.extra.fx.blend.Add
import org.openrndr.extra.fx.blend.Normal
import org.openrndr.extra.fx.blur.ApproximateGaussianBlur
import org.openrndr.extra.fx.distort.HorizontalWave
import org.openrndr.extra.fx.distort.VerticalWave
import org.openrndr.extra.fx.shadow.DropShadow
import org.openrndr.extra.textwriter.Cursor
import org.openrndr.extra.textwriter.writer
import org.openrndr.shape.Rectangle
import kotlin.math.cos
import kotlin.math.sin

fun main() = application {
    program {
        val composite = compose {
            draw {
                drawer.fill = ColorRGBa.PINK
                drawer.stroke = null
                drawer.circle(
                    width / 2.0 + sin(seconds * 2) * 100.0,
                    height / 2.0,
                    175.0
                )
            }

            layer {
                blend(Add()) {
                    clip = true
                }
                draw {
                    drawer.fill = ColorRGBa.PINK
                    drawer.stroke = null
                    drawer.circle(
                        width / 2.0,
                        height / 2.0 + cos(seconds * 2) * 100.0,
                        100.0
                    )
                }
                post(ApproximateGaussianBlur()) {
                    // -- this is actually a function called for every draw
                    window = 25
                    sigma = cos(seconds) * 10.0 + 10.01
                }
            }
        }
        extend {
            composite.draw(drawer)
        }
    }
}Common use-cases
Masking
In this case we have a text and an image that we only want to draw
where there is text. This can be achieved
by using nested layers and a Normal blend with clip enabled.
import org.openrndr.application
import org.openrndr.color.ColorRGBa
import org.openrndr.draw.loadFont
import org.openrndr.draw.loadImage
import org.openrndr.extra.color.colormatrix.tint
import org.openrndr.extra.compositor.*
import org.openrndr.extra.fx.blend.Add
import org.openrndr.extra.fx.blend.Normal
import org.openrndr.extra.fx.blur.ApproximateGaussianBlur
import org.openrndr.extra.fx.distort.HorizontalWave
import org.openrndr.extra.fx.distort.VerticalWave
import org.openrndr.extra.fx.shadow.DropShadow
import org.openrndr.extra.textwriter.Cursor
import org.openrndr.extra.textwriter.writer
import org.openrndr.shape.Rectangle
import kotlin.math.cos
import kotlin.math.sin

fun main() = application {
    program {
        val composite = compose {
            draw {
                drawer.clear(ColorRGBa.PINK)
            }
            layer {
                // -- we nest layers to prevent the text layer to be blended with the background
                // -- before it is blended with the image layer
                layer {
                    // -- notice how we load the font inside the layer
                    // -- this only happens once
                    val font = loadFont("data/fonts/default.otf", 112.0)
                    draw {
                        drawer.fill = ColorRGBa.WHITE
                        drawer.fontMap = font
                        val message = "HELLO WORLD"
                        writer {
                            val w = textWidth(message)
                            cursor = Cursor((width - w) / 2.0, height / 2.0 + cos(seconds) * 200.0)
                            text(message)
                        }
                    }
                }
                layer {
                    // -- again, loading resources inside the layer is perfectly fine
                    // -- it is also a good way to keep code free of clutter
                    val image = loadImage("data/images/cheeta.jpg")

                    // -- we use a normal blend here
                    blend(Normal()) {
                        // -- and we set `clip` to true
                        clip = true
                    }
                    draw {
                        // -- we modify the image opacity as a demonstration
                        drawer.drawStyle.colorMatrix = tint(ColorRGBa.WHITE.opacify(cos(seconds * 4)))
                        drawer.image(image)
                    }
                }
            }
        }
        extend {
            composite.draw(drawer)
        }
    }
}Drop shadows
In case you want to place text over an image and want to guarantee the text is readable. You can use a drop shadow post effect to draw the text with a bit of a shadow that sets the text apart from the image.
import org.openrndr.application
import org.openrndr.color.ColorRGBa
import org.openrndr.draw.loadFont
import org.openrndr.draw.loadImage
import org.openrndr.extra.color.colormatrix.tint
import org.openrndr.extra.compositor.*
import org.openrndr.extra.fx.blend.Add
import org.openrndr.extra.fx.blend.Normal
import org.openrndr.extra.fx.blur.ApproximateGaussianBlur
import org.openrndr.extra.fx.distort.HorizontalWave
import org.openrndr.extra.fx.distort.VerticalWave
import org.openrndr.extra.fx.shadow.DropShadow
import org.openrndr.extra.textwriter.Cursor
import org.openrndr.extra.textwriter.writer
import org.openrndr.shape.Rectangle
import kotlin.math.cos
import kotlin.math.sin

fun main() = application {
    program {
        val composite = compose {
            draw {
                drawer.clear(ColorRGBa.PINK)
            }
            layer {
                // -- load the image inside the layer
                val image = loadImage("data/images/cheeta.jpg")
                draw {
                    drawer.image(image)
                }
            }
            // -- add a second layer with text and a drop shadow
            layer {
                // -- notice how we load the font inside the layer
                // -- this only happens once
                val font = loadFont("data/fonts/default.otf", 112.0)

                draw {
                    drawer.fill = ColorRGBa.WHITE
                    drawer.fontMap = font
                    val message = "HELLO WORLD"
                    writer {
                        box = Rectangle(0.0, 0.0, width * 1.0, height * 1.0)
                        val w = textWidth(message)
                        cursor = Cursor((width - w) / 2.0, height / 2.0 + cos(seconds) * 200.0)
                        text(message)
                    }
                }
                post(DropShadow()) {
                    window = 10
                    gain = 1.0
                    yShift = -sin(seconds) * 8.0
                }
            }
        }

        extend {
            composite.draw(drawer)
        }
    }
}Multiple effects per layer
Post effects are not limited to one per layer. One can create a chain
of post-processing filters by just
calling post() {} multiple times per layer. In the following example
we create a text layer that uses 3 post effects:
two distortion effects followed by a blur filter.
import org.openrndr.application
import org.openrndr.color.ColorRGBa
import org.openrndr.draw.loadFont
import org.openrndr.draw.loadImage
import org.openrndr.extra.color.colormatrix.tint
import org.openrndr.extra.compositor.*
import org.openrndr.extra.fx.blend.Add
import org.openrndr.extra.fx.blend.Normal
import org.openrndr.extra.fx.blur.ApproximateGaussianBlur
import org.openrndr.extra.fx.distort.HorizontalWave
import org.openrndr.extra.fx.distort.VerticalWave
import org.openrndr.extra.fx.shadow.DropShadow
import org.openrndr.extra.textwriter.Cursor
import org.openrndr.extra.textwriter.writer
import org.openrndr.shape.Rectangle
import kotlin.math.cos
import kotlin.math.sin

fun main() = application {
    program {
        val composite = compose {
            layer {
                // -- load the image inside the layer
                val image = loadImage("data/images/cheeta.jpg")
                draw {
                    drawer.image(image)
                }
            }

            // -- add a second layer with text and a drop shadow
            layer {
                // -- notice how we load the font inside the layer
                // -- this only happens once
                val font = loadFont("data/fonts/default.otf", 112.0)
                draw {
                    drawer.fill = ColorRGBa.BLACK
                    drawer.fontMap = font
                    val message = "HELLO WORLD"
                    writer {
                        box = Rectangle(0.0, 0.0, width * 1.0, height * 1.0)
                        val w = textWidth(message)
                        cursor = Cursor((width - w) / 2.0, height / 2.0)
                        text(message)
                    }
                }
                // -- this effect is processed first
                post(HorizontalWave()) {
                    amplitude = cos(seconds * 3) * 0.1
                    frequency = sin(seconds * 2) * 4
                    segments = (1 + Math.random() * 20).toInt()
                    phase = seconds
                }
                // -- this is the second effect
                post(VerticalWave()) {
                    amplitude = sin(seconds * 3) * 0.1
                    frequency = cos(seconds * 2) * 4
                    segments = (1 + Math.random() * 20).toInt()
                    phase = seconds
                }
                // -- and this effect is processed last
                post(ApproximateGaussianBlur()) {
                    sigma = cos(seconds * 2) * 5.0 + 5.01
                    window = 25
                }
            }
        }
        extend {
            composite.draw(drawer)
        }
    }
}Opacity
orx-fx is made with opacity as a first-class citizen. By default a
layer is set to be fully transparent, most blending and post operations
are using and preserving opacity.
Blending
Blending describes how the contents of two layers are combined in a composite.
The blend functionality orx-compositor can be used with any
filter that performs a blend
operation. The orx-fx filter collection provides
a selection of ready-made blend filters.
The following (orx-fx) blend filters work well with opacity and have
a configurable clip option with which the destination layer can be
clipped against the source input’s opacity:
ColorBurnColorDodgeDarkenHardLightLightenMultiplyNormalOverlayScreenAddSubtract
Reusing a layer
It is possible to use the color buffer of a previously declared
layer by using aside.
import org.openrndr.application
import org.openrndr.color.ColorRGBa
import org.openrndr.draw.loadFont
import org.openrndr.draw.loadImage
import org.openrndr.extra.color.colormatrix.tint
import org.openrndr.extra.compositor.*
import org.openrndr.extra.fx.blend.Add
import org.openrndr.extra.fx.blend.Normal
import org.openrndr.extra.fx.blur.ApproximateGaussianBlur
import org.openrndr.extra.fx.distort.HorizontalWave
import org.openrndr.extra.fx.distort.VerticalWave
import org.openrndr.extra.fx.shadow.DropShadow
import org.openrndr.extra.textwriter.Cursor
import org.openrndr.extra.textwriter.writer
import org.openrndr.shape.Rectangle
import kotlin.math.cos
import kotlin.math.sin

fun main() = application {
    program {

        val composite = compose {
            // -- keep a reference to the layer for later use
            val first = aside {
                draw {
                    // -- draw something
                }
                // post(...) { ... }
            }

            layer {
                draw {
                    drawer.image(first) // <-- reuse a previous layer
                }
                post(ApproximateGaussianBlur())
                blend(Add())
            }
        }
        extend {
            composite.draw(drawer)
        }
    }
}Multisampling
Edges on rotated or curved contours can look pixelated in some cases. We can control the smoothness / anti-aliasing of each layer by specifying its multisampling level like this:
layer(multisample = BufferMultisample.SampleCount(8)) {where 8 is the desired level.
Values between 0 (the default) and 16 are typically used.