Compositing using orx-compositor
orx-compositor offers a simple DSL for the creation of layered graphics. The compositor manages blending and post-processing of layers for you.
orx-compositor works well together with orx-fx, orx-gui, and orx-olive, although they are not a required combination it is worth checking out what the combination has to offer.
Prerequisites
Assuming you are working on an openrndr-template based project, all you have to do is enable orx-compositor in the orxFeatures set in build.gradle.kts and reimport the gradle project.
Workflow
Let us now work through the workflow of orx-compositor. One usually starts with an OPENRNDR skeleton program:
fun main() = application {
    program {
        extend {
        }
    }
}
Which by itself, of course, does nothing. Let’s extend this skeleton a bit and add the basics for layered graphics. We add a composite using compose {} and we make sure that our OPENRNDR program draws it on refresh.
Note, if this fails you can fix it by adding import org.openrndr.extra.compositor.draw.
fun main() = application {
    program {
        val composite = compose {
        }

        extend {
            composite.draw(drawer)
        }
    }
}
Now let’s draw something. We do this by adding a draw {} inside the compose {}. Here we see we use drawer like we would use it normally (it is captured in the closure). We also added a println to demonstrate that the code inside compose {} is executed once, however, code inside draw {} is executed every time the composite is drawn.
fun main() = application {
    program {
        val composite = compose {
            println("this is only executed once")

            draw {
                drawer.fill = ColorRGBa.PINK
                drawer.stroke = null
                drawer.circle(width / 2.0, height / 2.0, 175.0)
            }
        }

        extend {
            composite.draw(drawer)
        }
    }
}
Let’s get to what orx-compositor promises: layered graphics. We do this by adding a layer {} inside our composite, and inside this layer we add another draw.
Every layer has an isolated draw state to prevent users from leaking draw state.
fun main() = application {
    program {
        val composite = compose {
            draw {
                drawer.fill = ColorRGBa.PINK
                drawer.stroke = null
                drawer.circle(width / 2.0, height / 2.0, 175.00)
            }

            layer {
                draw {
                    drawer.fill = ColorRGBa.PINK
                    drawer.stroke = null
                    drawer.circle(width / 2.0, height / 2.0 + 100.0, 100.0)
                }
            }
        }

        extend {
            composite.draw(drawer)
        }
    }
}
This produces:
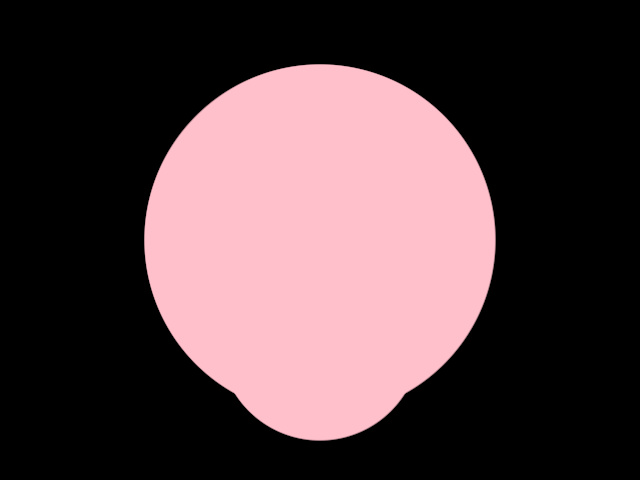
You may be thinking: “yeah great, we added all that extra structure to the code, but it doesn’t do a single thing that could not be achieved by drawing two circles consecutively”. And you’re right. However, there are now two things we can add with ease: blends and posts. Here a blend describes how a layer’s contents should be combined with the layer it covers, and a post a filter that is applied after the contents have been drawn.
Let’s add a blend and a post to our layer and see what it does:
fun main() = application {
    program {
        val composite = compose {
            draw {
                drawer.fill = ColorRGBa.PINK
                drawer.stroke = null
                drawer.circle(width / 2.0, height / 2.0, 175.0)
            }

            layer {
                blend(Add()) {
                    clip = true
                }
                draw {
                    drawer.fill = ColorRGBa.PINK
                    drawer.stroke = null
                    drawer.circle(width / 2.0, height / 2.0 + 100.0, 100.0)
                }
                post(ApproximateGaussianBlur()) {
                    window = 25
                    sigma = 10.00
                }
            }
        }
        extend {
            composite.draw(drawer)
        }
    }
}
The output:
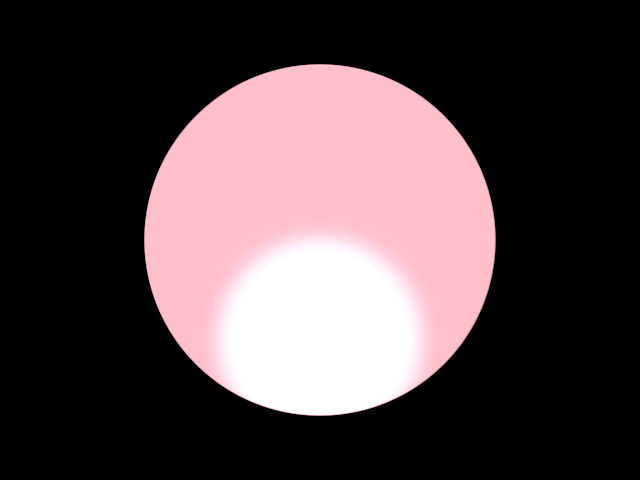
We now see a couple of differences. The smaller circle is blurred while the larger circle is not; The area where the two circles overlap is brighter; The smaller circle is clipped against the larger circle.
These are a results that are not as easily replicated without orx-compositor.
Note that the parameters for the post filters (and blend) can be animated, just as the layers contents can be animated:
fun main() = application {
    program {
        val composite = compose {
            draw {
                drawer.fill = ColorRGBa.PINK
                drawer.stroke = null
                drawer.circle(width / 2.0 + sin(seconds * 2) * 100.0, height / 2.0, 175.0)
            }

            layer {
                blend(Add()) {
                    clip = true
                }
                draw {
                    drawer.fill = ColorRGBa.PINK
                    drawer.stroke = null
                    drawer.circle(width / 2.0, height / 2.0 + cos(seconds * 2) * 100.0, 100.0)
                }
                post(ApproximateGaussianBlur()) {
                    // -- this is actually a function called for every draw
                    window = 25
                    sigma = cos(seconds) * 10.0 + 10.01
                }
            }
        }
        extend {
            composite.draw(drawer)
        }
    }
}
Common use-cases
Masking
In this case we have a text and an image that we only want to draw where there is text. This can be achieved by using nested layers and a Normal blend with clip enabled.
fun main() = application {
    program {
        val composite = compose {
            draw {
                drawer.clear(ColorRGBa.PINK)
            }
            layer {
                // -- we nest layers to prevent the text layer to be blended with the background
                // -- before it is blended with the image layer
                layer {
                    // -- notice how we load the font inside the layer
                    // -- this only happens once
                    val font = loadFont("data/fonts/default.otf", 112.0)
                    draw {
                        drawer.fill = ColorRGBa.WHITE
                        drawer.fontMap = font
                        val message = "HELLO WORLD"
                        writer {
                            val w = textWidth(message)
                            cursor = Cursor((width - w) / 2.0, height / 2.0 + cos(seconds) * 200.0)
                            text(message)
                        }
                    }
                }
                layer {
                    // -- again, loading resources inside the layer is perfectly fine
                    // -- it is also a good way to keep code free of clutter
                    val image = loadImage("data/images/cheeta.jpg")

                    // -- we use a normal blend here
                    blend(Normal()) {
                        // -- and we set `clip` to true
                        clip = true
                    }
                    draw {
                        // -- we modify the image opacity as a demonstration
                        drawer.drawStyle.colorMatrix = tint(ColorRGBa.WHITE.opacify(cos(seconds * 4)))
                        drawer.image(image)
                    }
                }
            }
        }
        extend {
            composite.draw(drawer)
        }
    }
}
Drop shadows
In case you want to place text over an image and want to guarantee the text is readable. You can use a drop shadow post effect to draw the text with a bit of a shadow that sets the text apart from the image.
fun main() = application {
    program {
        val composite = compose {
            draw {
                drawer.clear(ColorRGBa.PINK)
            }
            layer {
                // -- load the image inside the layer
                val image = loadImage("data/images/cheeta.jpg")
                draw {
                    drawer.image(image)
                }
            }
            // -- add a second layer with text and a drop shadow
            layer {
                // -- notice how we load the font inside the layer
                // -- this only happens once
                val font = loadFont("data/fonts/default.otf", 112.0)

                draw {
                    drawer.fill = ColorRGBa.WHITE
                    drawer.fontMap = font
                    val message = "HELLO WORLD"
                    writer {
                        box = Rectangle(0.0, 0.0, width * 1.0, height * 1.0)
                        val w = textWidth(message)
                        cursor = Cursor((width - w) / 2.0, height / 2.0 + cos(seconds) * 200.0)
                        text(message)
                    }
                }
                post(DropShadow()) {
                    window = 10
                    gain = 1.0
                    yShift = -sin(seconds) * 8.0
                }
            }
        }

        extend {
            composite.draw(drawer)
        }
    }
}
Multiple effects per layer
Post effects are not limited to one per layer. One can create a chain of post-processing filters by just calling post() {} multiple times per layer. In the following example we create a text layer that uses 3 post effects: two distortion effects followed by a blur filter.
fun main() = application {
    program {
        val composite = compose {
            layer {
                // -- load the image inside the layer
                val image = loadImage("data/images/cheeta.jpg")
                draw {
                    drawer.image(image)
                }
            }

            // -- add a second layer with text and a drop shadow
            layer {
                // -- notice how we load the font inside the layer
                // -- this only happens once
                val font = loadFont("data/fonts/default.otf", 112.0)
                draw {
                    drawer.fill = ColorRGBa.BLACK
                    drawer.fontMap = font
                    val message = "HELLO WORLD"
                    writer {
                        box = Rectangle(0.0, 0.0, width * 1.0, height * 1.0)
                        val w = textWidth(message)
                        cursor = Cursor((width - w) / 2.0, height / 2.0)
                        text(message)
                    }
                }
                // -- this effect is processed first
                post(HorizontalWave()) {
                    amplitude = cos(seconds * 3) * 0.1
                    frequency = sin(seconds * 2) * 4
                    segments = (1 + Math.random() * 20).toInt()
                    phase = seconds
                }
                // -- this is the second effect
                post(VerticalWave()) {
                    amplitude = sin(seconds * 3) * 0.1
                    frequency = cos(seconds * 2) * 4
                    segments = (1 + Math.random() * 20).toInt()
                    phase = seconds
                }
                // -- and this effect is processed last
                post(ApproximateGaussianBlur()) {
                    sigma = cos(seconds * 2) * 5.0 + 5.01
                    window = 25
                }
            }
        }
        extend {
            composite.draw(drawer)
        }
    }
}
Opacity
orx-fx is made with opacity as a first-class citizen. By default a layer is set to be fully transparent, most blending and post operations are using and preserving opacity.
Blending
Blending describes how the contents of two layers are combined in a composite. The blend functionality orx-compositor can be used with any filter that performs a blend operation. The orx-fx filter collection provides a selection of ready-made blend filters.
The following (orx-fx) blend filters work well with opacity and have a configurable clip option with which the destination layer can be clipped against the source input’s opacity:
ColorBurnColorDodgeDarkenHardLightLightenMultiplyNormalOverlayScreenAddSubtract
Reusing a layer
It is possible to use the color buffer of a previously declared layer by using aside.
fun main() = application {
    program {

        val composite = compose {
            // -- keep a reference to the layer for later use
            val first = aside {
                draw {// -- draw something
                }// post(...) { ... }

            }

            layer {
                draw {
                    drawer.image(first) // <-- reuse a previous layer
                }
                post(ApproximateGaussianBlur())
                blend(Add())
            }
        }
        extend {
            composite.draw(drawer)
        }
    }
}
Multisampling
Edges on rotated or curved contours can look pixelated in some cases. We can control the smoothness / anti-aliasing of each layer by specifying its multisampling level like this:
layer(multisample = BufferMultisample.SampleCount(8)) {
where 8 is the desired level. Values between 0 (the default) and 16 are typically used.